前言
这周在学习RAC,找到一篇很好的文章,(摘录下来,对部分内容进行一定的翻译,感觉翻译要比简单的读,更需要字斟句酌,更容易留下较深的印象,加深理解,翻译出来,也可以帮助到别人)。原本计划是部分翻译,最后没有掌握好,还是全部翻译了,一共花费了将近十个小时,之前对这篇文章的研究也花费了将近十个小时,这样效率有点低,下一步,要看看怎么提高一下这个效率。
这篇文章跟着走一遍,对于RAC基本就能有一定的印象了,然后再针对每个细节来进行学习,就能较快掌握住RAC了,否则,只看官网,官网的文章写得感觉并不是很清楚。
原帖位置:https://www.raywenderlich.com/2493-reactivecocoa-tutorial-the-definitive-introduction-part-1-2。
ReactiveCocoa Tutorial – The Definitive Introduction: Part 1/2
Get to grips with ReactiveCocoa in this 2-part tutorial series. Put the paradigms to one-side, and understand the practical value with work-through examples.
在这两部分指导系统掌握 ReactiveCocoa。先把范式放在一边,先通过对这些例子的实践来理解实际的意思。
As an iOS developer, nearly every line of code you write is in reaction to some event; a button tap, a received network message, a property change (via Key Value Observing) or a change in user’s location via CoreLocation are all good examples. However, these events are all encoded in different ways; as actions, delegates, KVO, callbacks and others. ReactiveCocoa defines a standard interface for events, so they can be more easily chained, filtered and composed using a basic set of tools.
作为一个iOS开发者,几乎你编写的每一行代码都是一个对某种事件的响应;一个按钮的点击,一个网络消息的接收,一个属性的改变(通过Key Value Observing)或者通过 CoreLocation 的用户位置的改变都是很好的例子。然后,这些事件被用不同的方式进行的编码;被当做 action, delegates, KVO, callback 和其他。ReactiveCocoa 定义了一个标准的事件界面,这样他们可以被更容易地链化,过滤和使用一个基本的工具集来编写。
Sound confusing? Intriguing? … Mind blowing? Then read on :]
听上去有些困惑?有趣? ... 令人兴奋?来继续阅读吧 :]
ReactiveCocoa combines a couple of programming styles:
ReactiveCocoa 由一组编程风格组成:
- Functional Programming which makes use of higher order functions, i.e. functions which take other functions as their arguments
函数式编程 这使用了很多高阶函数,例如函数使用其它函数作为参数
- Reactive Programming which focuses of data-flows and change propagation
响应式编程 这聚焦于数据流和改变的传播
For this reason, you might hear ReactiveCocoa described as a Functional Reactive Programming (or FRP) framework.
因为这个原因,你可能听到过把ReactiveCocoa描述成一个函数响应式框架。
Rest assured, that is as academic as this tutorial is going to get! Programming paradigms are a fascinating subject, but the rest of this ReactiveCocoa tutorials focuses solely on the practical value, with work-through examples instead of academic theories.
请放心,这就像本教程的学术内容一样! 编程范式是一个引人入胜的主题,但ReactiveCocoa教程的其余部分仅关注实用价值,并通过实例来代替学术理论。
The Reactive Playground
响应式游乐场
Throughout this ReactiveCocoa tutorial, you’ll be introducing reactive programming to a very simple example application, the ReactivePlayground. Download the starter project, then build and run to verify you have everything set up correctly.
通过这个指导,你将引入响应式编程到一个非常简单的样例程序中,就是这个响应式游乐场。下载这个starter project,然后编译并且运行它去校验你已经正确安装了所有的事情。
ReactivePlayground is a very simple app that presents a sign-in screen to the user. Supply the correct credentials, which are, somewhat imaginatively, user for the username, and password for the password, and you’ll be greeted by a picture of a lovely little kitten.
ReactivePlayground 是一个非常简单的app代表了一个sign-in屏幕给用户。提供正确的凭证,有点想象力,用户名是user, 密码是 password, 然后你将会看到一只可爱的小猫的欢迎页。

Awww! How cute!
喔!多么可爱!
Right now it’s a good point to spend a little time looking through the code of this starter project. It is quite simple, so it shouldn’t take long.
现在是时候花费一些时间去看一下这个项目的代码。它非常简单,所以这不用花很长时间。
Open RWViewController.m and take a look around. How quickly can you identify the condition that results in the enabling of the Sign In button? What are the rules for showing / hiding the
signInFailurelabel? In this relatively simple example, it might take only a minute or two to answer these questions. For a more complex example, you should be able to see how this same type of analysis might take quite a bit longer.
打开RWViewController.m大概看一下。 您能多快识别出产生启用Sign In按钮的条件? 显示/隐藏signInFailure标签的规则是什么? 在这个相对简单的例子中,回答这些问题可能只需要一两分钟。 对于更复杂的示例,您应该能够看到相同类型的分析可能需要更长的时间。
With the use of ReactiveCocoa, the underlying intent of the application will become a lot clearer. It’s time to get started!
随着ReactiveCocoa的使用,这个程序的潜在意图会更加清楚。让我们开始吧!
Adding the ReactiveCocoa Framework
增加 ReactiveCocoa 框架
The easiest way to add the ReactiveCocoa framework to your project is via CocoaPods. If you’ve never used CocoaPods before it might make sense to follow the Introduction To CocoaPods tutorial on this site, or at the very least run through the initial steps of that tutorial so you can install the prerequisites.
最容易的增加ReactiveCocoa框架到你的项目中的方法是通过CocoaPods。如果你没有使用过它,那么遵循着Introduction To CocoaPods的指导是有意义的,或者至少运行一下那个指导的初始步骤,所以你就可以安装依赖了。
Note: If for some reason you don’t want to use CocoaPods you can still use ReactiveCocoa, just follow the Importing ReactiveCocoa steps in the documentation on GitHub.
注意:如果因为什么原因,你不想使用CocoaPods, 你仍然可以使用ReactiveCocoa, 只要跟着在Github上的Importing ReactiveCocoa的文档的步骤。
If you still have the ReactivePlayground project open in Xcode, then close it now. CocoaPods will create an Xcode workspace, which you’ll want to use instead of the original project file.
如果你的ReactivePlayground项目是打开的,那么现在关上它。CocoaPods将会创建一个Xcode工作空间,你可以使用那个来替换原本的项目文件。
Open Terminal. Navigate to the folder where your project is located and type the following:
打开终端。切换到项目目录,输入以下命令:
touch Podfile
open -e Podfile
This creates an empty file called Podfile and opens it with TextEdit. Copy and paste the following lines into the TextEdit window:
这将创建一个空的名字是Podfile的文件,用文本编辑器打开它。复制并且贴入下面的代码:
platform :ios, '7.0'

pod 'ReactiveCocoa', '2.1.8'
This sets the platform to iOS, the minimum SDK version to 7.0, and adds the ReactiveCocoa framework as a dependency.
这个设置了iOS的平台,最低SDK版本是7.0,并且增加了ReactiveCocoa框架作为依赖。
Once you’ve saved this file, go back to the Terminal window and issue the following command:
一旦你保存了这个文件,回到终端,输入下面的命令:
pod install
You should see an output similar to the following:
你将会看到类似以下的输出:
Analyzing dependencies
Downloading dependencies
Installing ReactiveCocoa (2.1.8)
Generating Pods project
Integrating client project

[!] From now on use `RWReactivePlayground.xcworkspace`.
This indicates that the ReactiveCocoa framework has been downloaded, and CocoaPods has created an Xcode workspace to integrate the framework into your existing application.
这意味着ReactiveCocoa框架已经被下载,并且CocoaPods创建了一个Xcode工作空间,集成了框架到你的程序中。
Open up the newly generated workspace, RWReactivePlayground.xcworkspace, and look at the structure CocoaPods created inside the Project Navigator:
打开新生成的工作空间,RWReactivePlayground.xcworkspace,看一下 CocoaPods 在项目浏览器中创建的结构:

You should see that CocoaPods created a new workspace and added the original project, RWReactivePlayground, together with a Pods project that includes ReactiveCocoa. CocoaPods really does make managing dependencies a breeze!
你应该看到 CocoaPods 创建了一个新的工作空间,并且增加了原始的项目,RWReactivePlayground,和一个包含着ReactiveCocoa的 Pods 项目在一起。CocoaPods 确实使管理依赖变得轻而易举。
You’ll notice this project’s name is
ReactivePlayground, so that must mean it’s time to play …
你将会注意到这个项目的名字是 ReactivePlayground, 所以是时候来玩了 ...
Time To Play
游玩时间到
As mentioned in the introduction, ReactiveCocoa provides a standard interface for handling the disparate stream of events that occur within your application. In ReactiveCocoa terminology these are called signals, and are represented by the
RACSignalclass.
就像介绍里面提到,ReactiveCocoa提供了一个标准的界面,来处理不同的产生自你的应用中的事件流。在ReactiveCocoa的术语中,它们被称为signal(信号,后文都称为signal),被RACSignal类所代表。
Open the initial view controller for this app, RWViewController.m, and import the ReactiveCocoa header by adding the following to the top of the file:
打开这个应用的初始的view controller,RWViewController.m, 引入ReactiveCocoa头文件。
#import <ReactiveCocoa/ReactiveCocoa.h>
You aren’t going to replace any of the existing code just yet, for now you’re just going to play around a bit. Add the following code to the end of the
viewDidLoadmethod:
你还不能替代现有的任何代码,你可以先运行一下。在viewDidLoad方法底部加入下面的代码:
[self.usernameTextField.rac_textSignal subscribeNext:^(id x) {
  NSLog(@"%@", x);
}];
Build and run the application and type some text into the username text field. Keep an eye on the console and look for an output similar to the following:
编译并且运行这个程序,在username文本域输入一些字符。留心控制台,会看到类似下面的输出:
2013-12-24 14:48:50.359 RWReactivePlayground[9193:a0b] i
2013-12-24 14:48:50.436 RWReactivePlayground[9193:a0b] is
2013-12-24 14:48:50.541 RWReactivePlayground[9193:a0b] is
2013-12-24 14:48:50.695 RWReactivePlayground[9193:a0b] is t
2013-12-24 14:48:50.831 RWReactivePlayground[9193:a0b] is th
2013-12-24 14:48:50.878 RWReactivePlayground[9193:a0b] is thi
2013-12-24 14:48:50.901 RWReactivePlayground[9193:a0b] is this
2013-12-24 14:48:51.009 RWReactivePlayground[9193:a0b] is this
2013-12-24 14:48:51.142 RWReactivePlayground[9193:a0b] is this m
2013-12-24 14:48:51.236 RWReactivePlayground[9193:a0b] is this ma
2013-12-24 14:48:51.335 RWReactivePlayground[9193:a0b] is this mag
2013-12-24 14:48:51.439 RWReactivePlayground[9193:a0b] is this magi
2013-12-24 14:48:51.535 RWReactivePlayground[9193:a0b] is this magic
2013-12-24 14:48:51.774 RWReactivePlayground[9193:a0b] is this magic?
You can see that each time you change the text within the text field, the code within the block executes. No target-action, no delegates — just signals and blocks. That’s pretty exciting!
你可以看到每一次你在这个文本域修改了文本,这个 block 中的代码会运行。没有target-action, 没有delegates ----只有signal和 block。是不是很令人兴奋!
ReactiveCocoa signals (represented by
RACSignal) send a stream of events to their subscribers. There are three types of events to know: next, error and completed. A signal may send any number of next events before it terminates after an error, or it completes. In this part of the tutorial you’ll focus on the next event. Be sure to read part two when it’s available to learn about error and completed events.
ReactiveCocoa signals(被 RACSignal 所代表)发送了一个事件流给它们的订阅者。有三种类型的时间需要了解:next,error 和 completed。一个signal在它在一个error或者completed结束之前可以发送任意数量的next事件。在这部分的指导中,你将会聚焦于next事件。当有条件去学习error和completed事件时,要保证去阅读part two。
RACSignalhas a number of methods you can use to subscribe to these different event types. Each method takes one or more blocks, with the logic in your block executing when an event occurs. In this case, you can see that thesubscribeNext:method was used to supply a block that executes on each next event.
RACSignal有很多方法,你可以用来去订阅这些不同的事件类型。每一个方法接收一个或多个block,当事件发生时,block中的逻辑会被执行。在这种情况下,您可以看到subscribeNext:方法用于提供在每个next事件上执行的块。
The ReactiveCocoa framework uses categories to add signals to many of the standard UIKit controls so you can add subscriptions to their events, which is where the
rac_textSignalproperty on the text field came from.
ReactiveCocoa框架使用了categories去给很多标准的 UIKit 组件增加signals,这样你可以给它们增加订阅,这就是这个文本域的rac_textSignal域的来源。
But enough with the theory, it’s time to start making ReactiveCocoa do some work for you!
但是理论足够(这里为什么要用“但是”),是时候开始让ReactiveCocoa为你做一些工作了!
ReactiveCocoa has a large range of operators you can use to manipulate streams of events. For example, assume you’re only interested in a username if it’s more than three characters long. You can achieve this by using the
filteroperator. Update the code you added previously inviewDidLoadto the following:
ReactiveCocoa有很多的操作符,你可以用来操纵事件流。举例来说,假设你只对3个字符以上的username感兴趣。你可以用filter 操作符来得到这个。更新之前你加入到viewDidLoad的代码:
[[self.usernameTextField.rac_textSignal
  filter:^BOOL(id value) {
    NSString *text = value;
    return text.length > 3;
  }]
  subscribeNext:^(id x) {
    NSLog(@"%@", x);
  }];
If you build and run, then type some text into the text field, you should find that it only starts logging when the text field length is greater than three characters:
如果您构建并运行,然后在文本字段中键入一些文本,您会发现它只在文本字段长度大于三个字符时才开始记录:
2013-12-26 08:17:51.335 RWReactivePlayground[9654:a0b] is t
2013-12-26 08:17:51.478 RWReactivePlayground[9654:a0b] is th
2013-12-26 08:17:51.526 RWReactivePlayground[9654:a0b] is thi
2013-12-26 08:17:51.548 RWReactivePlayground[9654:a0b] is this
2013-12-26 08:17:51.676 RWReactivePlayground[9654:a0b] is this
2013-12-26 08:17:51.798 RWReactivePlayground[9654:a0b] is this m
2013-12-26 08:17:51.926 RWReactivePlayground[9654:a0b] is this ma
2013-12-26 08:17:51.987 RWReactivePlayground[9654:a0b] is this mag
2013-12-26 08:17:52.141 RWReactivePlayground[9654:a0b] is this magi
2013-12-26 08:17:52.229 RWReactivePlayground[9654:a0b] is this magic
2013-12-26 08:17:52.486 RWReactivePlayground[9654:a0b] is this magic?
What you’ve created here is a very simple pipeline. It is the very essence of Reactive Programming, where you express your application’s functionality in terms of data flows.
你在这里创建的是一个非常简单的管道。 这是Reactive Programming的本质,您可以根据数据流表达应用程序的功能。
It can help to picture these flows graphically:
用图片来表示这个流是很有帮助的:

In the above diagram you can see that the
rac_textSignalis the initial source of events. The data flows through afilterthat only allows events to pass if they contain a string with a length that is greater than three. The final step in the pipeline issubscribeNext:where your block logs the event value.
在上面这个图中,你可以看到rac_textSignal是事件的初始来源。数据流通过一个filter,仅仅允许包含字符串长度大于三的事件通过。管道的最后一步是subscribeNext: ,那里你的 block 输出了事件的值。
At this point it’s worth noting that the output of the
filteroperation is also anRACSignal. You could arrange the code as follows to show the discrete pipeline steps:
在这点上,值得注意的是,filter的输出也是一个RACSignal。你也可以像下面这样组织代码,来显示离散的管道步骤:
RACSignal *usernameSourceSignal =
    self.usernameTextField.rac_textSignal;

RACSignal *filteredUsername = [usernameSourceSignal
  filter:^BOOL(id value) {
    NSString *text = value;
    return text.length > 3;
  }];

[filteredUsername subscribeNext:^(id x) {
  NSLog(@"%@", x);
}];
Because each operation on an
RACSignalalso returns anRACSignalit’s termed a fluent interface. This feature allows you to construct pipelines without the need to reference each step using a local variable.
因为在一个RACSignal的每一个操作都返回一个RACSignal,所以它被称为fluent interface。这个特征允许你去构建管道,而不需要使用一个本地变量去指向管道的每一步。
Note: ReactiveCocoa makes heavy use of blocks. If you’re new to blocks, you might want to read Apple’s Blocks Programming Topics. And if, like me, you’re familiar with blocks, but find the syntax a little confusing and hard to remember, you might find the amusingly titled f*****gblocksyntax.com quite useful! (We censored the word to protect the innocent, but the link is fully functional.)
注意:ReactiveCocoa大量地使用了 blocks。如果你对block不了解,你应该去阅读苹果的 Blocks Programming Topics。或者,像我一样,你对blocks比较熟悉,但是发现这个语法有一些困扰,或者难于记忆,你可以去看看 f*****gblocksyntax.com,会很有帮助。(这个网址带着一些脏字,为了照顾读者,所以这里隐去了几个字母,但是链接是完全有效的。)
A Little Cast
一个小的转换
If you updated your code to split it into the various
RACSignalcomponents, now is the time to revert it back to the fluent syntax:
如果你更新你的代码,把它分解成几个RACSignal组件,现在是时候把它转换成流利的语法:
[[self.usernameTextField.rac_textSignal
  filter:^BOOL(id value) {
    NSString *text = value; // implicit cast
    return text.length > 3;
  }]
  subscribeNext:^(id x) {
    NSLog(@"%@", x);
  }];
The implicit cast from
idtoNSString, at the indicated location in the code above, is less than elegant. Fortunately, since the value passed to this block is always going to be anNSString, you can change the parameter type itself. Update your code as follows:
这个从id到 NSString的隐含转换,在上面代码的带有注释的哪一行,是不优雅的。幸运的是,因为传递给这个block的值永远应该是一个NSString,所以你可以修改入参类型,就像下面这样:
[[self.usernameTextField.rac_textSignal
  filter:^BOOL(NSString *text) {
    return text.length > 3;
  }]
  subscribeNext:^(id x) {
    NSLog(@"%@", x);
  }];
Build and run to confirm this works just as it did previously.
构建并且运行去确认它工作起来和之前是一样的。
What’s An Event?
事件是什么?
So far this tutorial has described the different event types, but hasn’t detailed the structure of these events. What’s interesting is that an event can contain absolutely anything!
到这里,这份指导已经描述了不同的事件类型,但是还没有揭示这些事件的结构细节。有趣的是,一个事件可以包含任何东西!
As an illustration of this point, you’re going to add another operation to the pipeline. Update the code you added to
viewDidLoadas follows:
作为对这点的一个阐述,你可以给管道增加另外一个操作。更新你之前增加的代码:
[[[self.usernameTextField.rac_textSignal
  map:^id(NSString *text) {
    return @(text.length);
  }]
  filter:^BOOL(NSNumber *length) {
    return [length integerValue] > 3;
  }]
  subscribeNext:^(id x) {
    NSLog(@"%@", x);
  }];
If you build and run you’ll find the app now logs the length of the text instead of the contents:
如果你构建并且运行它,你回发现现在程序打印的是文本的长度,而不再是它的内容了:
2013-12-26 12:06:54.566 RWReactivePlayground[10079:a0b] 4
2013-12-26 12:06:54.725 RWReactivePlayground[10079:a0b] 5
2013-12-26 12:06:54.853 RWReactivePlayground[10079:a0b] 6
2013-12-26 12:06:55.061 RWReactivePlayground[10079:a0b] 7
2013-12-26 12:06:55.197 RWReactivePlayground[10079:a0b] 8
2013-12-26 12:06:55.300 RWReactivePlayground[10079:a0b] 9
2013-12-26 12:06:55.462 RWReactivePlayground[10079:a0b] 10
2013-12-26 12:06:55.558 RWReactivePlayground[10079:a0b] 11
2013-12-26 12:06:55.646 RWReactivePlayground[10079:a0b] 12
The newly added map operation transforms the event data using the supplied block. For each next event it receives, it runs the given block and emits the return value as a next event. In the code above, the map takes the
NSStringinput and takes its length, which results in anNSNumberbeing returned.
新增加的map操作使用提供的block转换了事件的数据。对于每一个它接收到的next事件,它运行给定的block,并且把返回值作为 next事件发射出去。在上面的代码中,map接收了NSString输入,并且获取了它的长度,用一个NSNumber返回出去。
For a stunning graphic depiction of how this works, take a look at this image:
有关其工作原理的精美图像描述,请查看此图像:
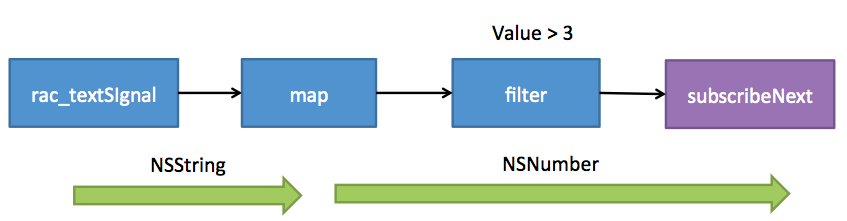
As you can see, all of the steps that follow the
mapoperation now receiveNSNumberinstances. You can use themapoperation to transform the received data into anything you like, as long as it’s an object.
就像你可以看到的,所有跟着map的步骤现在都接收到一个NSNumber实例。你可以使用map操作来转换接收到的数据成你想要的任何东西,只要它是一个对象。
Note: In the above example the
text.lengthproperty returns anNSUInteger, which is a primitive type. In order to use it as the contents of an event, it must be boxed. Fortunately the Objective-C literal syntax provides and option to do this in a rather concise manner –@(text.length).
注意:在上面的例子中,这个text.length返回一个NSUInteger, 这是一个原始类型。为了在一个事件的内容中使用它,它必须被包裹。幸运的是, Objective-C literal syntax提供了一个非常简洁的方式去处理这个 -- @(text.length)。(这里好像是写错了“provides and option”似乎不合语法)
That’s enough playing! It’s time to update the ReactivePlayground app to use the concepts you’ve learned so far. You may remove all of the code you’ve added since you started this tutorial.
这就足够了! 是时候更新ReactivePlayground应用程序以使用您迄今为止学到的概念。 您可以删除自本教程开始以来添加的所有代码。
Creating Valid State Signals
创建有效状态信号
The first thing you need to do is create a couple of signals that indicate whether the username and password text fields are valid. Add the following to the end of
viewDidLoadin RWViewController.m:
你需要做的第一件事情是创建一对信号,用来指示username和password 两个文本域是否有效。在RWViewController.m 的 viewDidLoad底部增加下面的代码:
RACSignal *validUsernameSignal =
  [self.usernameTextField.rac_textSignal
    map:^id(NSString *text) {
      return @([self isValidUsername:text]);
    }];

RACSignal *validPasswordSignal =
  [self.passwordTextField.rac_textSignal
    map:^id(NSString *text) {
      return @([self isValidPassword:text]);
    }];
As you can see, the above code applies a
maptransform to therac_textSignalfrom each text field. The output is a boolean value boxed as aNSNumber.
就像你看到的,上面代码使用了一个 map 去给每一个文本域转换 rac_textSignal。输出是被一个NSNumber包裹的布尔值。
The next step is to transform these signals so that they provide a nice background color to the text fields. Basically, you subscribe to this signal and use the result to update the text field background color. One viable option is as follows:
下一步是去转换这些信号,使得它们可以给这些文本域提供背景色。基本上,您订阅此信号并使用结果更新文本字段背景颜色。 一个可行的选择如下:
[[validPasswordSignal
  map:^id(NSNumber *passwordValid) {
    return [passwordValid boolValue] ? [UIColor clearColor] : [UIColor yellowColor];
  }]
  subscribeNext:^(UIColor *color) {
    self.passwordTextField.backgroundColor = color;
  }];
(Please don’t add this code, there’s a much more elegant solution coming!)
Conceptually you’re assigning the output of this signal to the
backgroundColorproperty of the text field. However, the code above is a poor expression of this; it’s all backwards!
从概念上讲,您将此信号的输出分配给文本字段的background的Color属性。 但是,上面的代码对此表达的不好; 一切都倒退了!(不是很好的响应式的表达方式)
Fortunately, ReactiveCocoa has a macro that allows you to express this with grace and elegance. Add the following code directly beneath the two signals you added to
viewDidLoad:
幸运的是,ReactiveCocoa有一个宏允许你用一种优雅的方式来表达。在你加入viewDidLoad的两个信号下面直接加入下面的代码:
RAC(self.passwordTextField, backgroundColor) =
  [validPasswordSignal
    map:^id(NSNumber *passwordValid) {
      return [passwordValid boolValue] ? [UIColor clearColor] : [UIColor yellowColor];
    }];

RAC(self.usernameTextField, backgroundColor) =
  [validUsernameSignal
    map:^id(NSNumber *passwordValid) {
     return [passwordValid boolValue] ? [UIColor clearColor] : [UIColor yellowColor];
    }];
The
RACmacro allows you to assign the output of a signal to the property of an object. It takes two arguments, the first is the object that contains the property to set and the second is the property name. Each time the signal emits a next event, the value that passes is assigned to the given property.
这个RAC宏允许你分配一个signal的输出给一个对象的属性。它使用了两个参数,第一个是那个对象,包含着将要设置的属性,第二个是属性名。每一次signal发射一个next事件,被传递的值就被分配给给定的属性。
This is a very elegant solution, don’t you think?
这是一种非常优雅的解决方案,你不觉得吗?
One last thing before you build and run. Locate the
updateUIStatemethod and remove the first two lines:
你构建和运行前,最后一件事情,找到updateUIState方法,移除前面两行:
self.usernameTextField.backgroundColor = self.usernameIsValid ? [UIColor clearColor] : [UIColor yellowColor];
self.passwordTextField.backgroundColor = self.passwordIsValid ? [UIColor clearColor] : [UIColor yellowColor];
That will clean up the non-reactive code.
这将清理非响应式的代码。
Build and run the application. You should find that the text fields look highlighted when invalid, and clear when valid.
构建并且运行程序。你可以发现文本域当无效时会变得高亮,有效时高亮会消失。
Visuals are nice, so here is a way to visualize the current logic. Here you can see two simple pipelines that take the text signals, map them to validity-indicating booleans, and then follow with a second mapping to a
UIColorwhich is the part that binds to the background color of the text field.
可视化是很好的,所以这里有一个办法是把这个逻辑可视化。(用图表的方式易于理解。)这里你可以看到两个简单的管道,接收文本signal,把他们map成指示有效的布尔型,然后再map成一个 UIColor,和文本域的background的color属性绑定起来。

Are you wondering why you created separate
validPasswordSignalandvalidUsernameSignalsignals, as opposed to a single fluent pipeline for each text field? Patience dear reader, the method behind this madness will become clear shortly!
你是否会有疑问,为什么要创建validPasswordSignal和validUsernameSignal两个信号,而不是为创建一个流畅的管道?请有点耐心,这种处理背后的方法马上就会变得清楚(就会出现了)。
Combining signals
合并信号
In the current app, the Sign In button only works when both the username and password text fields have valid input. It’s time to do this reactive-style!
在当前的程序中,这个Sign In按钮只在username和password两个文本域都有有效的输入时工作。是时候去把这个做成响应式了。
The current code already has signals that emit a boolean value to indicate if the username and password fields are valid;
validUsernameSignalandvalidPasswordSignal. Your task is to combine these two signals to determine when it is okay to enable the button.
当前的代码已经有了signal发射了一个布尔值去指示着username和password域是否有效:validUsernameSignal和validPasswordSignal。你的任务是合并这两个signal去决定什么时候可以让这个按钮开始工作。
At the end of
viewDidLoadadd the following:
在viewDidLoad底部增加:
RACSignal *signUpActiveSignal =
  [RACSignal combineLatest:@[validUsernameSignal, validPasswordSignal]
                    reduce:^id(NSNumber *usernameValid, NSNumber *passwordValid) {
                      return @([usernameValid boolValue] && [passwordValid boolValue]);
                    }];
The above code uses the
combineLatest:reduce:method to combine the latest values emitted byvalidUsernameSignalandvalidPasswordSignalinto a shiny new signal. Each time either of the two source signals emits a new value, the reduce block executes, and the value it returns is sent as the next value of the combined signal.
上面的代码使用了combineLatest:reduce:方法去合并由validUsernameSignal和validPasswordSignal发射的最后的值到一个闪亮的新的signal。每一次这两个源signal中的一个发射出一个新值,这个reduce block就执行,并且它返回的值被作为combined signal的next的值。
Note: The
RACSignalcombine methods can combine any number of signals, and the arguments of the reduce block correspond to each of the source signals. ReactiveCocoa has a cunning little utility class,RACBlockTrampolinethat handles the reduce block’s variable argument list internally. In fact, there are a lot of cunning tricks hidden within the ReactiveCocoa implementation, so it’s well worth pulling back the covers!
注意:RACSignal方法可以合并任意数量的信号,reduce block的参数对应于每个源signal。 ReactiveCocoa有一个狡猾的小实用程序类RACBlockTrampoline,它在内部处理reduce block的变量参数列表。 事实上,在ReactiveCocoa实现中隐藏了许多小技巧,(最后一句没搞明白)!
Now that you have a suitable signal, add the following to the end of
viewDidLoad. This will wire it up to the enabled property on the button:
现在你有了一个合适的signal, 在viewDidLoad底部增加底下的代码。这会将其连接到按钮上的enabled属性:
[signUpActiveSignal subscribeNext:^(NSNumber *signupActive) {
   self.signInButton.enabled = [signupActive boolValue];
 }];
Before running this code, it’s time to rip out the old implementation. Remove these two properties from the top of the file:
在运行这个代码前,是时候移除旧的实现了。在文件顶部移除这两个属性:
@property (nonatomic) BOOL passwordIsValid;
@property (nonatomic) BOOL usernameIsValid;
From near the top of
viewDidLoad, remove the following:
在viewDidLoad顶部,移除底下的代码:
// handle text changes for both text fields
[self.usernameTextField addTarget:self
                           action:@selector(usernameTextFieldChanged)
                 forControlEvents:UIControlEventEditingChanged];
[self.passwordTextField addTarget:self
                           action:@selector(passwordTextFieldChanged)
                 forControlEvents:UIControlEventEditingChanged];
Also remove the
updateUIState,usernameTextFieldChangedandpasswordTextFieldChangedmethods. Whew! That’s a lot of non-reactive code you just disposed of! You’ll be thankful you did.
并且移除updateUIState, usernameTextFieldChanged和passwordTextFieldChanged方法。喔!你刚刚移除了好多非响应式的代码!你将来会感谢你所做的。
Finally, make sure to remove the call to
updateUIStatefromviewDidLoadas well.
最后,确认从viewDidLoad移除掉对updateUIState的调用。
If you build and run, check the Sign In button. It should be enabled because the username and password text fields are valid, as they were before.
如果你构建并且运行了,检查Sign In按钮。如果username和password文本域有效,它将可以使用,就像前面一样。
An update to the application logic diagram gives the following:
更新应用的逻辑图:

The above illustrates a couple of important concepts that allow you to perform some pretty powerful tasks with ReactiveCocoa;
上面描绘了两个重要的概念,允许你用ReactiveCocoa去完成一些强大的任务;
- Splitting – signals can have multiple subscribers and serve as the source for more multiple subsequent pipeline steps. In the above diagram, note that the boolean signals that indicate password and username validity are split and used for a couple of different purposes.
- Combining – multiple signals may be combined to create new signals. In this case, two boolean signals were combined. However, you can combine signals that emit any value type.
- 分割 -- signal可以有多个订阅者,可以作为后续管道步骤的源。在上面的图中,注意那个布尔型signal指示这password和 username的有效性被分割并且被用于不同的目的。
- 合并 -- 多个signal可以合并去创建一个新的signal。在这个例子中,两个布尔型的signal被合并。然后,你可以合并发生任何值类型的signal。
The result of these changes is the application no longer has private properties that indicate the current valid state of the two text fields. This is one of the key differences you’ll find when you adopt a reactive style — you don’t need to use instance variables to track transient state.
这些改变的结果是应用程序不再拥有私有属性来指示这两个文本域当前的这有效性。这是一个关键的不同,你将会发现当你采纳响应式方式,你不再需要实例变量去跟踪瞬时状态。
Reactive Sign-in
响应式 Sign-in
The application currently uses the reactive pipelines illustrated above to manage the state of the text fields and button. However, the button press handling still uses actions, so the next step is to replace the remaining application logic in order to make it all reactive!
当前的应用程序使用上面所描述的响应式的管道来管理文本域和按钮的状态。然后,按钮的按下处理仍旧使用了actions, 所以下一步是取代这些剩余的逻辑,来让整个程序都变成响应式。
The Touch Up Inside event on the Sign In button is wired up to the
signInButtonTouchedmethod inRWViewController.mvia a storyboard action. You’re going to replace this with the reactive equivalent, so you first need to disconnect the current storyboard action.
这个在Sign In按钮上的Touch Up Inside事件被通过storyboard的action绑定在RWViewController.m的signInButtonTouched方法上。你将使用响应式的等价物来要替代这些,所以你先要断开当前的storyboard的action。
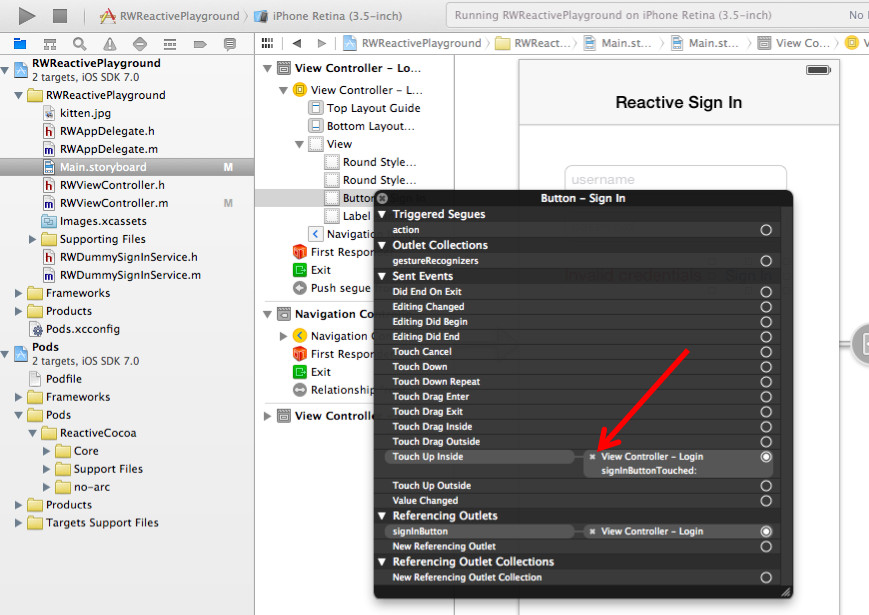
Open up Main.storyboard, locate the Sign In button, ctrl-click to bring up the outlet / action connections and click the x to remove the connection. If you feel a little lost, the diagram below kindly shows where to find the delete button:
打开Main.storyboard, 找到Sign In按钮,按下ctrl和左键来打开outlet / action连接,并且点击那个x来移除这个连接。如果你没跟上,看下图,可以找到那个delete按钮。
You’ve already seen how the ReactiveCocoa framework adds properties and methods to the standard UIKit controls. So far you’ve used
rac_textSignal, which emits events when the text changes. In order to handle events you need to use another of the methods that ReactiveCocoa adds to UIKit,rac_signalForControlEvents.
你可以看到了ReactiveCocoa框架如何给标准的UIKit控件增加属性和方法了。到现在为止,你已经使用了rac_textSignal, 它会在文本改变时发射事件。为了处理这些事件,你需要使用ReactiveCocoa增加给UIKit的另外一个方法,rac_signalForControlEvents。
Returning to
RWViewController.m, add the following to the end ofviewDidLoad:
返回RWViewController.m, 在viewDidLoad的地步增加下面的代码:
[[self.signInButton
   rac_signalForControlEvents:UIControlEventTouchUpInside]
   subscribeNext:^(id x) {
     NSLog(@"button clicked");
   }];
The above code creates a signal from the button’s
UIControlEventTouchUpInsideevent and adds a subscription to make a log entry every time this event occurs.
上面的代码从按钮的UIControlEventTouchUpInside创建了一个signal,并且增加了一个订阅,在每一次事件发生时输出一条日志。
Build and run to confirm the message actually logs. Bear in mind that the button will enable only when the username and password are valid, so be sure to type some text into both fields before tapping the button!
构建并且运行代码来确认消息实际上输出了。请记住,只有当用户名和密码有效时才会启用该按钮,因此请务必在点击按钮之前在两个字段中键入一些文本!
You should see messages in the Xcode console similar to the following:
你可以在Xcode的控制台上看到类似下面的输出。
2013-12-28 08:05:10.816 RWReactivePlayground[18203:a0b] button clicked
2013-12-28 08:05:11.675 RWReactivePlayground[18203:a0b] button clicked
2013-12-28 08:05:12.605 RWReactivePlayground[18203:a0b] button clicked
2013-12-28 08:05:12.766 RWReactivePlayground[18203:a0b] button clicked
2013-12-28 08:05:12.917 RWReactivePlayground[18203:a0b] button clicked
Now that the button has a signal for the touch event, the next step is to wire this up with the sign-in process itself. This presents something of a problem — but that’s good, you don’t mind a problem, right? Open up
RWDummySignInService.hand take a look at the interface:
注意这个按钮有一个touch事件的signal, 下一步就是把它绑定到sign-in过程中去。这提出了一个问题 - 但这很好,你不介意一个问题,对吧? 打开RWDummySignInService.h并查看界面:
typedef void (^RWSignInResponse)(BOOL);

@interface RWDummySignInService : NSObject

- (void)signInWithUsername:(NSString *)username
                  password:(NSString *)password
                  complete:(RWSignInResponse)completeBlock;

@end
This service takes a username, a password and a completion block as parameters. The given block is run when the sign-in is successful or when it fails. You could use this interface directly within the
subscribeNext:block that currently logs the button touch event, but why would you? This is the kind of asynchronous, event-based behavior that ReactiveCocoa eats for breakfast!
此服务将用户名,密码和完成块作为参数。 登录成功或失败时运行给定的块。 您可以直接在当前记录按钮触摸事件的subscribeNext:块中使用此接口,但为什么会这样?
Note: A dummy service is being used in this tutorial for simplicity, so that you don’t have any dependencies on external APIs. However, you’ve now run up against a very real problem, how do you use APIs not expressed in terms of signals?
注意:为简单起见,本教程中使用了虚拟服务,因此您对外部API没有任何依赖性。 但是,您现在遇到了一个非常现实的问题,您如何使用未表达信号的API?
Creating Signals
创建信号
Fortunately, it’s rather easy to adapt existing asynchronous APIs to be expressed as a signal. First, remove the current
signInButtonTouched:method from the RWViewController.m. You don’t need this logic as it will be replaced with a reactive equivalent.
幸运的是,将已经存在的异步API调整表达为一个signal是一件很容易的事情。首先,从RWViewController.m文件中移除当前的signInButtonTouched:方法。你不再需要这个逻辑,因为它将被一个响应式的等价物所替代。
Stay in RWViewController.m and add the following method:
留在RWViewController.m这个文件并且增加下面的方法:
-(RACSignal *)signInSignal {
  return [RACSignal createSignal:^RACDisposable *(id<RACSubscriber> subscriber) {
    [self.signInService
     signInWithUsername:self.usernameTextField.text
     password:self.passwordTextField.text
     complete:^(BOOL success) {
       [subscriber sendNext:@(success)];
       [subscriber sendCompleted];
     }];
    return nil;
  }];
}
The above method creates a signal that signs in with the current username and password. Now for a breakdown of its component parts.
上面的方法创建了一个signal,发射于当前的用户名和密码。现在我们分解它的组成部分。
The above code uses the
createSignal:method onRACSignalfor signal creation. The block that describes this signal is a single argument, and is passed to this method. When this signal has a subscriber, the code within this block executes.
上面的代码使用了RACSignal的createSignal:,为了来创建signal。描述了这个signal的block是一个参数,传递给这个方法。当这个signal有一个订阅者,这个block中的代码将会被执行。block这里所指的是这一段:
^RACDisposable *(id<RACSubscriber> subscriber) {
    [self.signInService
     signInWithUsername:self.usernameTextField.text
     password:self.passwordTextField.text
     complete:^(BOOL success) {
       [subscriber sendNext:@(success)];
       [subscriber sendCompleted];
     }];
    return nil;
  }
这是一个block,返回值是RACDisposable *,参数是id<RACSubscriber> subscriber,实现了RACSubscriber协议的subscriber对象。这个地方需要反复理解block的语法和作用,否则很容易不理解。把block当做一个匿名函数来理解,这里体现的就是函数式编程,传递进去的参数不再是一个变量,而是一个函数,接受这个参数的方法,不再是对这个变量进行赋值、传递,而是对这个函数进行调用。
The block is passed a single
subscriberinstance that adopts theRACSubscriberprotocol, which has methods you invoke in order to emit events; you may also send any number of next events, terminated with either an error or complete event. In this case, it sends a single next event to indicate whether the sign-in was a success, followed by a complete event.
这个block被传递了一个subscriber实例,实现了RACSubscriber协议,这个协议拥有一些方法,使得你可以调用去发射event;你也可以发射任意数量的next事件,最后终止于一个error或者complete事件。在这个案例中,它发送了一个next事件,指明了sign-in是否成功,跟随者一个complete事件。
The return type for this block is an
RACDisposableobject, and it allows you to perform any clean-up work that might be required when a subscription is cancelled or trashed. This signal does not have any clean-up requirements, hencenilis returned.
这个block的返回类型是一个RACDisposable对象,它允许你去执行一些清理工作--当一个subscription(订阅)被取消或者被丢弃时需要进行的。这里的这个signal没有清理的需求,所以返回了一个nil。
As you can see, it’s surprisingly simple to wrap an asynchronous API in a signal!
就像你所看到的,在一个signal中包裹一个异步的API是令人惊讶的简单容易。
Now to make use of this new signal. Update the code you added to the end of
viewDidLoadin the previous section as follows:
现在来使用这个signal。更新你刚才增加在viewDidLoad底部的代码:
[[[self.signInButton
   rac_signalForControlEvents:UIControlEventTouchUpInside]
   map:^id(id x) {
     return [self signInSignal];
   }]
   subscribeNext:^(id x) {
     NSLog(@"Sign in result: %@", x);
   }];
The above code uses the
mapmethod used earlier to transform the button touch signal into the sign-in signal. The subscriber simply logs the result.
上面的代码使用前面使用过的map方法来把按钮接触的signal转换成一个sign-in的signal,subscriber简单地打印出结果。
If you build and run, then tap the Sign In button, and take a look at the Xcode console, you’ll see the result of the above code …
如果你构造了并且运行,然后点击Sign In按钮,看一下Xcode的控制台,你会看到上面代码的结果...
… and the result isn’t quite what you might have expected!
... 并不是你想要的!
2014-01-08 21:00:25.919 RWReactivePlayground[33818:a0b] Sign in result:
                                   <RACDynamicSignal: 0xa068a00> name: +createSignal:
The
subscribeNext:block has been passed a signal all right, but not the result of the sign-in signal!
这个subscribeNext: block被传递了一个signal,但不是sign-in signal的结果!
Time to illustrate this pipeline so you can see what’s going on:
到了该说明这个管道的时候了,这样你就可以看到发生了什么:

The
rac_signalForControlEventsemits a next event (with the sourceUIButtonas its event data) when you tap the button. The map step creates and returns the sign-in signal, which means the following pipeline steps now receive aRACSignal. That is what you’re observing at thesubscribeNext:step.
当你点击这个按钮的时候,这个rac_signalForControlEvents发射了一个next事件(伴随着源UIButton作为它的事件的数据)。map这一步创建并且返回这个sign-in signal,这意味着后面的管道这一步现在可以接收一个RACSignal。这就是你在 subscribeNext: 这一步所观察到的。
The situation above is sometimes called the signal of signals; in other words an outer signal that contains an inner signal. If you really wanted to, you could subscribe to the inner signal within the outer signal’s
subscribeNext:block. However it would result in a nested mess! Fortunately, it’s a common problem, and ReactiveCocoa is ready for this scenario.
上面这种情况有时候被称为 signal of signals (信号的信号);换句话说,一个外部的signal包含了一个内部的signal。如果你真的想要,你可以订阅在外部的signal的subscribeNext: 块里面的内部的signal。然后它会导致一个嵌套混乱!幸运的是,这是一个很普通的问题,ReactiveCocoa已经为这种场景做好了准备。
Signal of Signals
信号的信号
The solution to this problem is straightforward, just change the
mapstep to aflattenMapstep as shown below:
这个问题的解决方案是很直接的,仅仅修改map这一步为flattenMap,就像下面:
[[[self.signInButton
   rac_signalForControlEvents:UIControlEventTouchUpInside]
   flattenMap:^id(id x) {
     return [self signInSignal];
   }]
   subscribeNext:^(id x) {
     NSLog(@"Sign in result: %@", x);
   }];
This maps the button touch event to a sign-in signal as before, but also flattens it by sending the events from the inner signal to the outer signal.
这把按钮的点击事件映射成一个sign-in信号,并且把它flattens, 通过发送事件从内部的signal 到外部的signal。(flatten是扁平化的意思,这里直接翻译成扁平化,不太好理解,所以还是用原词)
Build and run, and keep an eye on the console. It should now log whether the sign-in was successful or not:
编译并且运行,看一下控制台。现在它会输出sign-in是否成功:
2013-12-28 18:20:08.156 RWReactivePlayground[22993:a0b] Sign in result: 0
2013-12-28 18:25:50.927 RWReactivePlayground[22993:a0b] Sign in result: 1
Exciting stuff!
令人兴奋吧!
Now that the pipeline is doing what you want, the final step is to add the logic to the
subscribeNextstep to perform the required navigation upon successful sign-in. Replace the pipeline with the following:
现在,管道做了你想做的,最后一步是给subscribeNext这一步增加逻辑去执行在成功sign-in后所需要的导航。替换管道如下:
[[[self.signInButton
  rac_signalForControlEvents:UIControlEventTouchUpInside]
  flattenMap:^id(id x) {
    return [self signInSignal];
  }]
  subscribeNext:^(NSNumber *signedIn) {
    BOOL success = [signedIn boolValue];
    self.signInFailureText.hidden = success;
    if (success) {
      [self performSegueWithIdentifier:@"signInSuccess" sender:self];
    }
  }];
The
subscribeNext:block takes the result from the sign-in signal, updates the visibility of thesignInFailureTexttext field accordingly, and performs the navigation segue if required.
这个subscribeNext: 块使用了sign-in signal的结果,因此更新了signInFailureText文本域的可见性,并且执行了需要的导航。
Build and run to enjoy the kitten once more! Meow!
编译并且运行,再一次去享受这个小猫程序吧!喵!
Did you notice there is one small user experience issue with the current application? When the sign-in service validates the supplied credentials, is should disable the Sign In button. This prevents the user from repeating the same sign-in. Furthermore, if a failed sign-in attempt occurred, the error message should be hidden when the user tries to sign-in once again.
你有没有注意到,当前的程序有一个很小的用户体验问题?当sign-in service确认了所支持的凭证,是应该使Sign In按钮无效。这防止了用户重复登录。更进一步,如果一个失败的sign-in尝试发生,错误信息应该在用户尝试再次登录时隐藏。
But how should you add this logic to the current pipeline? Changing the button’s enabled state isn’t a transformation, filter or any of the other concepts you’ve encountered so far. Instead, it’s what is known as a side-effect; or logic you want to execute within a pipeline when a next event occurs, but it does not actually change the nature of the event itself.
但是你应该怎么去给当前的管道增加这个逻辑呢?修改这个按钮的enabled状态并不是一个转换,过滤或者任何你到现在为止接触到的概念。取而代之的,它是一个被称为side-effect副作用,这里没有贬义的意思)的概念。
Adding side-effects
增加副作用
Replace the current pipeline with the following:
像下面这样修改管道:
[[[[self.signInButton
   rac_signalForControlEvents:UIControlEventTouchUpInside]
   doNext:^(id x) {
     self.signInButton.enabled = NO;
     self.signInFailureText.hidden = YES;
   }]
   flattenMap:^id(id x) {
     return [self signInSignal];
   }]
   subscribeNext:^(NSNumber *signedIn) {
     self.signInButton.enabled = YES;
     BOOL success = [signedIn boolValue];
     self.signInFailureText.hidden = success;
     if (success) {
       [self performSegueWithIdentifier:@"signInSuccess" sender:self];
     }
   }];
You can see how the above adds a
doNext:step to the pipeline immediately after button touch event creation. Notice that thedoNext:block does not return a value, because it’s a side-effect; it leaves the event itself unchanged.
你可以看到上面是如何在按钮点击事件创建之后添加一个doNext:步骤给管道的。注意这个doNext:块不返回值,因为它是一个副作用;它留下了没有修改的事件。
The
doNext:block above sets the button enabled property toNO, and hides the failure text. Whilst thesubscribeNext:block re-enables the button, and either displays or hides the failure text based on the result of the sign-in.
这个doNext:块设置了按钮的enabled属性为NO,并且隐藏了失败的文本。同时subscribeNext:重新使按钮生效,并且根据 sign-in的结果或者显示或者隐藏失败的文本。
It’s time to update the pipeline diagram to include this side effect. Bask in all it’s glory:
是时候更新管道的图来包含这个副作用了。(Bask in all it’s glory这个意思没有翻译,还没有完全搞清楚)

Build and run the application to confirm the Sign In button enables and disables as expected.
编译并且运行这个程序去确认这个Sign In button像所期待的那样有效或者无效。
And with that, your work is done – the application is now fully reactive. Woot!
并且,伴随着这个,你的工作也完成了-- 这个程序已经是完全的响应式了。
If you got lost along the way, you can download the final project (complete with dependencies), or you can obtain the code from GitHub, where there is a commit to match each build and run step in this tutorial.
如果你没有跟上文章的思路,你可以下载final project最后的完整的工程),或者你可以从GitHub上去获取代码,里面有一个提交是匹配这篇知道里面的每一个编译和运行步骤。
Note: Disabling buttons while some asynchronous activity is underway is a common problem, and once again ReactiveCocoa is all over this little snafu. The
RACCommandencapsulates this concept, and has anenabledsignal that allows you to wire up the enabled property of a button to a signal. You might want to give the class a try.
注意:在进行某些异步活动时禁用按钮是一个常见问题,and once again ReactiveCocoa is all over this little snafu(后一句暂不会翻译)。这个RACCommand封装了这个概念,有一个enabled signal允许你连接一个按钮的enabled属性到一个 signal。You might want to give the class a try()。
Conclusions
结论
Hopefully this tutorial has given you a good foundation that will help you when starting to use ReactiveCocoa in your own applications. It can take a bit of practice to get used to the concepts, but like any language or program, once you get the hang of it it’s really quite simple. At the very core of ReactiveCocoa are signals, which are nothing more than streams of events. What could be simpler than that?
希望这个指导能给你一个很好的基础,帮助你开始在你的程序中使用ReactiveCocoa 。这需要你采用更多的练习去熟悉这些概念,就像任何语言或者程序一样,一旦你掌握了,它实际上很简单。ReactiveCocoa的核心是信号,它们只不过是事件流。 有什么比这更简单?
With ReactiveCocoa one of the interesting things I have found is there are numerous ways in which you can solve the same problem. You might want to experiment with this application, and adjust the signals and pipelines to change the way they split and combine.
采用ReactiveCocoa, 一个有意思的事情是,将会有很多种方法你来解决一个问题。你可以在这个程序里面去实验它,调整信号和管道的拆分和合并的方式。
It’s worth considering that the main goal of ReactiveCocoa is to make your code cleaner and easier to understand. Personally I find it easier to understand what an application does if its logic is represented as clear pipelines, using the fluent syntax.
值得思考的是,ReactiveCocoa的主要目标是让你的代码干净和容易被理解。就我个人而言,如果使用流畅的语法将其逻辑表示为清晰的管道,我会发现更容易理解应用程序的作用。
In the second part of this tutorial series you’ll learn about more advanced subjects such as error handing and how to manage code that executes on different threads. Until then, have fun experimenting!
在这篇指导系列的第二部分,你将会学到更多高级的课题,例如错误处理和如何去管理代码去在不同的线程上执行。在那之前,开心地实验吧!